
In this post, we are going to see how to create Spring boot hibernate example.
We will use Spring boot 1.5.3 Release version, it comes with hibernate 5. We will create a Spring boot hibernate application which will have JSP as user interface. It will provide user interface from which you can add, update or delete customer database.We will use controller, services and DAO classes to achieve these functionalities.We will connect to MySQL database using SessionFactory class of hibernate.
Github Source code:
Spring Boot Hibernate example:
Here are steps to create a Spring boot Hibernate example.
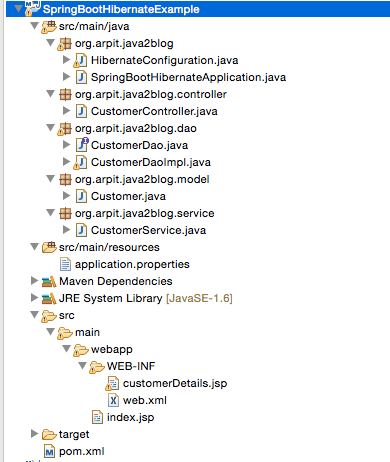
Project structure:
Tools used for creating below project:
- Spring Boot 1.5.3.RELEASE
- Spring 4.3.8.RELEASE
- Tomcat Embed 8
- Maven 3
- Java 8
- Eclipse
- Hibernate 5.3.5
- MySQL 5.7.18
Step 1: Create a dynamic web project using maven in eclipse named “SpringBootHibernateExample”.
Step 2: Change “pom.xml” as below:
<project xmlns="http://maven.apache.org/POM/4.0.0" xmlns:xsi="http://www.w3.org/2001/XMLSchema-instance"
    xsi:schemaLocation="http://maven.apache.org/POM/4.0.0 http://maven.apache.org/maven-v4_0_0.xsd">
    <modelVersion>4.0.0</modelVersion>
    <groupId>org.arpit.java2blog</groupId>
    <artifactId>SpringBootHibernateExample</artifactId>

    <version>0.0.1-SNAPSHOT</version>
    <name>SpringBootHibernateExample Maven Webapp</name>
    <url>http://maven.apache.org</url>
    <parent>
        <groupId>org.springframework.boot</groupId>
        <artifactId>spring-boot-starter-parent</artifactId>
        <version>1.5.3.RELEASE</version>
    </parent>
    <dependencies>
        <dependency>
            <groupId>org.springframework.boot</groupId>
            <artifactId>spring-boot-starter-web</artifactId>
        </dependency>
        <dependency>
            <groupId>org.springframework.boot</groupId>
            <artifactId>spring-boot-starter-data-jpa</artifactId>
        </dependency>
        <dependency>
            <groupId>mysql</groupId>
            <artifactId>mysql-connector-java</artifactId>
        </dependency>
        <!-- JSTL for JSP -->
        <dependency>
            <groupId>javax.servlet</groupId>
            <artifactId>jstl</artifactId>
        </dependency>

        <!-- For JSP compilation -->
        <dependency>
            <groupId>org.apache.tomcat.embed</groupId>
            <artifactId>tomcat-embed-jasper</artifactId>
            <scope>provided</scope>
        </dependency>
        <!-- https://mvnrepository.com/artifact/org.threeten/threetenbp -->
        <dependency>
            <groupId>org.threeten</groupId>
            <artifactId>threetenbp</artifactId>
            <version>0.7.2</version>
        </dependency>
    </dependencies>
    <build>
        <finalName>SpringBootHibernateExample</finalName>
    </build>
</project>
The spring-boot-starter-parent provides you all maven defaults required for any spring project.
Since we are developing a web application, we also need to add spring-boot-starter-web dependency and also we need to include pring-boot-starter-data-jpa to run this application with hibernate.You need to also put mysql-connector-java for MySql JDBC driver.If you are using any other database, you need to use different database connector.
Let’s do hibernate configuration first.
Hibernate Configuration
Step 3: Create a file named “HibernateConfiguration.java” in package .org.arpit.java2blog
package org.arpit.java2blog;
import java.util.Properties;

import javax.sql.DataSource;

import org.springframework.beans.factory.annotation.Value;
import org.springframework.boot.orm.jpa.EntityManagerFactoryBuilder;
import org.springframework.context.annotation.Bean;
import org.springframework.context.annotation.Configuration;
import org.springframework.jdbc.datasource.DriverManagerDataSource;
import org.springframework.orm.hibernate5.HibernateTransactionManager;
import org.springframework.orm.hibernate5.LocalSessionFactoryBean;
import org.springframework.orm.jpa.LocalContainerEntityManagerFactoryBean;
import org.springframework.orm.jpa.vendor.HibernateJpaVendorAdapter;
import org.springframework.transaction.annotation.EnableTransactionManagement;

@Configuration
@EnableTransactionManagement
public class HibernateConfiguration {
    @Value("${db.driver}")
    private String DRIVER;

    @Value("${db.password}")
    private String PASSWORD;

    @Value("${db.url}")
    private String URL;

    @Value("${db.username}")
    private String USERNAME;

    @Value("${hibernate.dialect}")
    private String DIALECT;

    @Value("${hibernate.show_sql}")
    private String SHOW_SQL;

    @Value("${hibernate.hbm2ddl.auto}")
    private String HBM2DDL_AUTO;

    @Value("${entitymanager.packagesToScan}")
    private String PACKAGES_TO_SCAN;

    @Bean
    public DataSource dataSource() {
        DriverManagerDataSource dataSource = new DriverManagerDataSource();
        dataSource.setDriverClassName(DRIVER);
        dataSource.setUrl(URL);
        dataSource.setUsername(USERNAME);
        dataSource.setPassword(PASSWORD);
        return dataSource;
    }

    @Bean
    public LocalSessionFactoryBean sessionFactory() {
        LocalSessionFactoryBean sessionFactory = new LocalSessionFactoryBean();
        sessionFactory.setDataSource(dataSource());
        sessionFactory.setPackagesToScan(PACKAGES_TO_SCAN);
        Properties hibernateProperties = new Properties();
        hibernateProperties.put("hibernate.dialect", DIALECT);
        hibernateProperties.put("hibernate.show_sql", SHOW_SQL);
        hibernateProperties.put("hibernate.hbm2ddl.auto", HBM2DDL_AUTO);
        sessionFactory.setHibernateProperties(hibernateProperties);

        return sessionFactory;
    }

    @Bean
    public HibernateTransactionManager transactionManager() {
        HibernateTransactionManager transactionManager = new HibernateTransactionManager();
        transactionManager.setSessionFactory(sessionFactory().getObject());
        return transactionManager;
    }
}
Above class is annotated with @Configuration and @Bean annotation. These annotations are used to define bean in Spring.
@Configuration is analogous to <beans> tag in Spring XML configuration and @Bean is analogous to <bean> tag.
@Value annotation is used to inject variables from properties files. In this case, it will read from application.properties which we are going to create in next step.
Step 4: Create a file named “application.properties” in package /src/main/resources
spring.mvc.view.prefix: /WEB-INF/
spring.mvc.view.suffix: .jsp

logging.level=DEBUG
# Database
db.driver: com.mysql.jdbc.Driver
db.url: jdbc:mysql://localhost:3306/CustomerData
db.username: root
db.password: admin

# Hibernate
hibernate.dialect: org.hibernate.dialect.MySQL5Dialect
hibernate.show_sql: true
hibernate.hbm2ddl.auto: create
entitymanager.packagesToScan: org

spring.jpa.properties.hibernate.enable_lazy_load_no_trans=true
Model class
Step 5: Create a file named “Customer.java” in package .org.arpit.java2blog.model
package org.arpit.java2blog.model;

import javax.persistence.Column;
import javax.persistence.Entity;
import javax.persistence.GeneratedValue;
import javax.persistence.GenerationType;
import javax.persistence.Id;
import javax.persistence.Table;

/*
 * This is our model class and it corresponds to Customer table in database
 */
@Entity
@Table(name="CUSTOMER")
public class Customer{

    @Id
    @Column(name="id")
    @GeneratedValue(strategy=GenerationType.IDENTITY)
    int id;

    @Column(name="customerName")
    String customerName;

    @Column(name="email")
    String email;

    public Customer() {
        super();
    }
    public Customer(String customerName,String email) {
        super();
        this.customerName=customerName;
        this.email=email;
    }
    public String getCustomerName() {
        return customerName;
    }
    public void setCustomerName(String customerName) {
        this.customerName = customerName;
    }
    public String getEmail() {
        return email;
    }
    public void setEmail(String email) {
        this.email = email;
    }
    public int getId() {
        return id;
    }
    public void setId(int id) {
        this.id = id;
    }

}
@Entity is used for making a persistent pojo class.For this java class,you will have corresponding table in database. @Column is used to map annotated attribute to corresponding column in table.
Create Customer table:
Create customer table in database with following DDL.
CUSTOMER (id int(11) NOT NULL AUTO_INCREMENT,customerName varchar(255) DEFAULT NULL,email varchar(255) DEFAULT NULL,PRIMARY KEY (
id))
Controller class
Step 6: Create a file named “CustomerController.java” in package .org.arpit.java2blog.controller
package org.arpit.java2blog.controller;

import java.util.List;

import org.arpit.java2blog.model.Customer;
import org.arpit.java2blog.service.CustomerService;
import org.springframework.beans.factory.annotation.Autowired;
import org.springframework.stereotype.Controller;
import org.springframework.ui.Model;
import org.springframework.web.bind.annotation.ModelAttribute;
import org.springframework.web.bind.annotation.PathVariable;
import org.springframework.web.bind.annotation.RequestMapping;
import org.springframework.web.bind.annotation.RequestMethod;

@Controller
public class CustomerController {

    @Autowired
    CustomerService customerService;

    @RequestMapping(value = "/getAllCustomers", method = RequestMethod.GET, headers = "Accept=application/json")
    public String getAllCustomers(Model model) {

        List<Customer> listOfCustomers = customerService.getAllCustomers();
        model.addAttribute("customer", new Customer());
        model.addAttribute("listOfCustomers", listOfCustomers);
        return "customerDetails";
    }

    @RequestMapping(value = "/", method = RequestMethod.GET, headers = "Accept=application/json")
    public String goToHomePage() {
        return "redirect:/getAllCustomers";
    }

    @RequestMapping(value = "/getCustomer/{id}", method = RequestMethod.GET, headers = "Accept=application/json")
    public Customer getCustomerById(@PathVariable int id) {
        return customerService.getCustomer(id);
    }

    @RequestMapping(value = "/addCustomer", method = RequestMethod.POST, headers = "Accept=application/json")
    public String addCustomer(@ModelAttribute("customer") Customer customer) {
        if(customer.getId()==0)
        {
            customerService.addCustomer(customer);
        }
        else
        {
            customerService.updateCustomer(customer);
        }

        return "redirect:/getAllCustomers";
    }

    @RequestMapping(value = "/updateCustomer/{id}", method = RequestMethod.GET, headers = "Accept=application/json")
    public String updateCustomer(@PathVariable("id") int id,Model model) {
        model.addAttribute("customer", this.customerService.getCustomer(id));
        model.addAttribute("listOfCustomers", this.customerService.getAllCustomers());
        return "customerDetails";
    }

    @RequestMapping(value = "/deleteCustomer/{id}", method = RequestMethod.GET, headers = "Accept=application/json")
    public String deleteCustomer(@PathVariable("id") int id) {
        customerService.deleteCustomer(id);
        return "redirect:/getAllCustomers";

    }
}
Service Layer
Step 7: Create a file named “CustomerService.java” in package .org.arpit.java2blog.service
package org.arpit.java2blog.service;

import java.util.List;

import javax.transaction.Transactional;

import org.arpit.java2blog.dao.CustomerDao;
import org.arpit.java2blog.springboot.Customer;
import org.springframework.beans.factory.annotation.Autowired;
import org.springframework.stereotype.Service;

@Service("customerService")
public class CustomerService {

    @Autowired
    CustomerDao customerDao;

    @Transactional
    public List<Customer> getAllCustomers() {
        return customerDao.getAllCustomers();
    }

    @Transactional
    public Customer getCustomer(int id) {
        return customerDao.getCustomer(id);
    }

    @Transactional
    public void addCustomer(Customer customer) {
        customerDao.addCustomer(customer);
    }

    @Transactional
    public void updateCustomer(Customer customer) {
        customerDao.updateCustomer(customer);

    }

    @Transactional
    public void deleteCustomer(int id) {
        customerDao.deleteCustomer(id);
    }
}
DAO layer
Step 8: Create a interface named “CustomerDao.java” in package .org.arpit.java2blog.dao
package org.arpit.java2blog.dao;

import java.util.List;

import org.arpit.java2blog.springboot.Customer;

public interface CustomerDao {
    public List<Customer> getAllCustomers() ;

    public Customer getCustomer(int id) ;

    public Customer addCustomer(Customer customer);

    public void updateCustomer(Customer customer) ;

    public void deleteCustomer(int id) ;
}
Step 9: Create a file named “CustomerDaoImpl.java” in package .org.arpit.java2blog.dao
package org.arpit.java2blog.dao;

import java.util.List;

import org.arpit.java2blog.springboot.Customer;
import org.hibernate.Hibernate;
import org.hibernate.Session;
import org.hibernate.SessionFactory;
import org.springframework.beans.factory.annotation.Autowired;
import org.springframework.stereotype.Repository;

@Repository
public class CustomerDaoImpl implements CustomerDao{

    @Autowired
    private SessionFactory sessionFactory;

    public void setSessionFactory(SessionFactory sf) {
        this.sessionFactory = sf;
    }

    public List<Customer> getAllCustomers() {
        Session session = this.sessionFactory.getCurrentSession();
        List<Customer>  customerList = session.createQuery("from Customer").list();
        return customerList;
    }

    public Customer getCustomer(int id) {
        Session session = this.sessionFactory.getCurrentSession();
        Customer customer = (Customer) session.get(Customer.class, id);
        return customer;
    }

    public Customer addCustomer(Customer customer) {
        Session session = this.sessionFactory.getCurrentSession();
        session.save(customer);
        return customer;
    }

    public void updateCustomer(Customer customer) {
        Session session = this.sessionFactory.getCurrentSession();
        session.update(customer);
    }

    public void deleteCustomer(int id) {
        Session session = this.sessionFactory.getCurrentSession();
        Customer p = (Customer) session.load(Customer.class, new Integer(id));
        if (null != p) {
            session.delete(p);
        }
    }
}
Views
Step 10: Create a file named “customerDetails.jsp” in package /WEB-INF/
<%@ taglib uri="http://java.sun.com/jsp/jstl/core" prefix="c" %>
<%@ taglib uri="http://www.springframework.org/tags" prefix="spring" %>
<%@ taglib uri="http://www.springframework.org/tags/form" prefix="form" %>
<html>
<head>
<style>
.blue-button{
    background: #25A6E1;
    filter: progid: DXImageTransform.Microsoft.gradient( startColorstr='#25A6E1',endColorstr='#188BC0',GradientType=0);
    padding:3px 5px;
    color:#fff;
    font-family:'Helvetica Neue',sans-serif;
    font-size:12px;
    border-radius:2px;
    -moz-border-radius:2px;
    -webkit-border-radius:4px;
    border:1px solid #1A87B9
}
table {
  font-family: "Helvetica Neue", Helvetica, sans-serif;
   width: 50%;
}
th {
  background: SteelBlue;
  color: white;
}
 td,th{
                border: 1px solid gray;
                width: 25%;
                text-align: left;
                padding: 5px 10px;
            }
</style>
</head>
<body>
<form:form method="post" modelAttribute="customer" action="${pageContext.request.contextPath}/addCustomer">
<table>
        <tr>
            <th colspan="2">Add Customer</th>
        </tr>
        <tr>
    <form:hidden path="id" />
          <td><form:label path="customerName">Customer Name:</form:label></td>
          <td><form:input path="customerName" size="30" maxlength="30"></form:input></td>
        </tr>
        <tr>
                <td><form:label path="email">Email:</form:label></td>
          <td><form:input path="email" size="30" maxlength="30"></form:input></td>
        </tr>
        <tr>
            <td colspan="2"><input type="submit"
                class="blue-button" /></td>
        </tr>
    </table>
</form:form>
</br>
<h3>Customer List</h3>
<c:if test="${!empty listOfCustomers}">
    <table class="tg">
    <tr>
        <th width="80">Id</th>
        <th width="120">Customer Name</th>
        <th width="120">Email</th>
        <th width="60">Edit</th>
        <th width="60">Delete</th>
    </tr>
    <c:forEach items="${listOfCustomers}" var="customer">
        <tr>
            <td>${customer.id}</td>
            <td>${customer.customerName}</td>
            <td>${customer.email}</td>
            <td><a href="<c:url value='/updateCustomer/${customer.id}' />" >Edit</a></td>
            <td><a href="<c:url value='/deleteCustomer/${customer.id}' />" >Delete</a></td>
        </tr>
    </c:forEach>
    </table>
</c:if>
</body>
</html>
Spring boot main file
Step 11: Create a file named “SpringBootHibernateApplication.java” in package .org.arpit.java2blog
package org.arpit.java2blog;
import org.springframework.boot.SpringApplication;
import org.springframework.boot.autoconfigure.SpringBootApplication;

@SpringBootApplication
public class SpringBootHibernateApplication {

    public static void main(String[] args)
    {
        SpringApplication.run(SpringBootHibernateApplication.class, args);
    }
}
We have just added @SpringBootApplication and it does all the work.
Let’s understand more about this annotation.
@SpringBootApplication is an annotation that adds all of the following:
@Configuration makes the class as a source of bean definitions for the application context.
@EnableAutoConfiguration enables Spring boot to add beans present in classpath setting and various property setting.
Normally you would add @EnableWebMvc for a Spring MVC application, but Spring Boot adds it automatically when it sees spring-webmvc on the classpath.
This flags the application as a web application and activates key behaviors such as setting up a DispatcherServlet.
@ComponentScan tells Spring to look for other components, configurations, and services in the default package, allowing it to find the controllers.
If specific packages are not defined, scanning will occur from the package of the class that declares this annotation.
Run the application
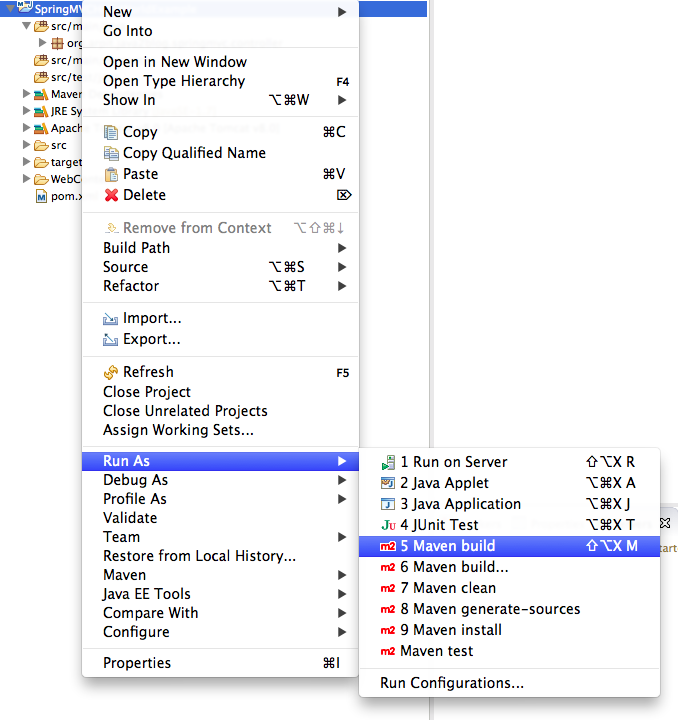
Step 12: It ‘s time to do maven build.
Right click on project -> Run as -> Maven build
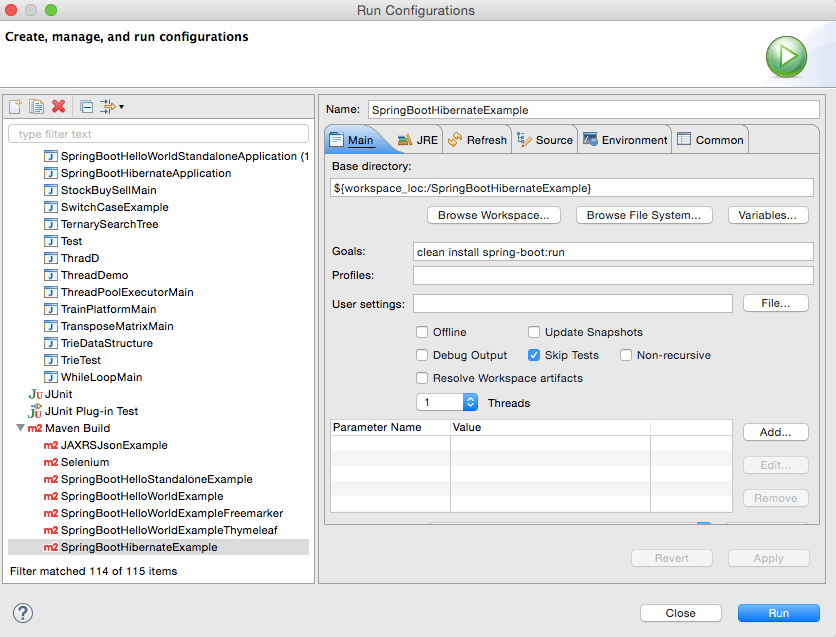
Step 13: Provide goals as clean install spring-boot:run (given below) and click on run
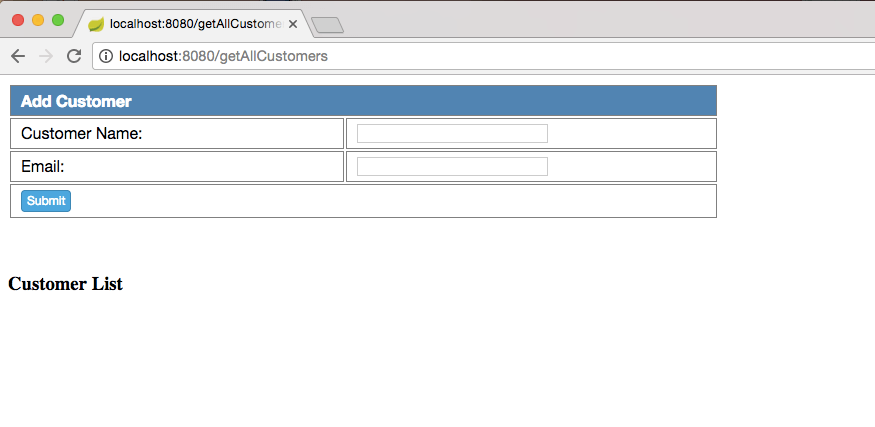
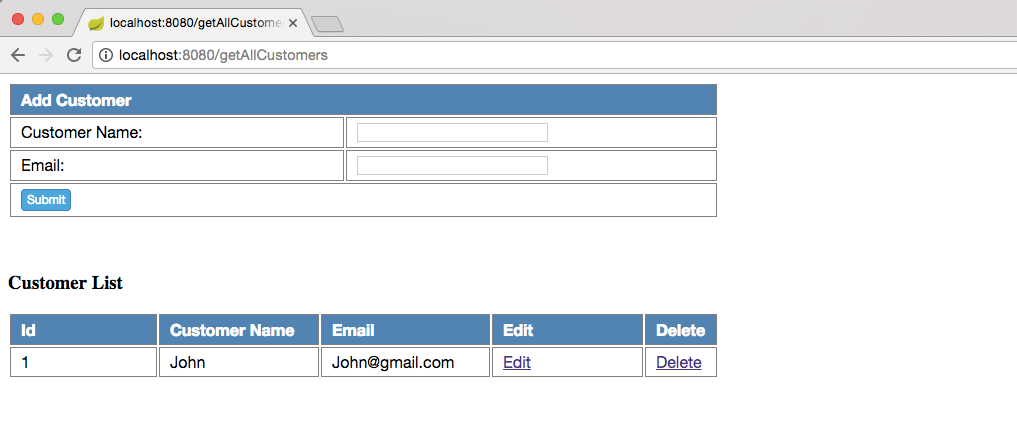
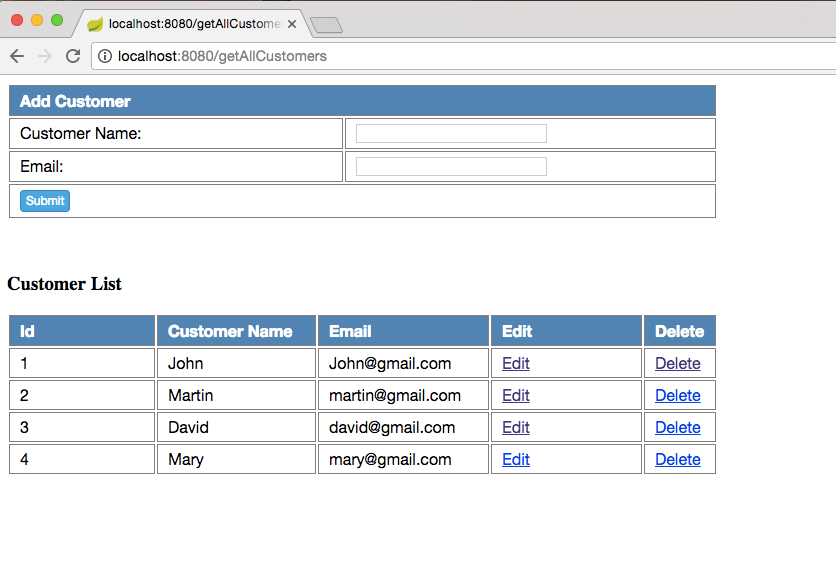
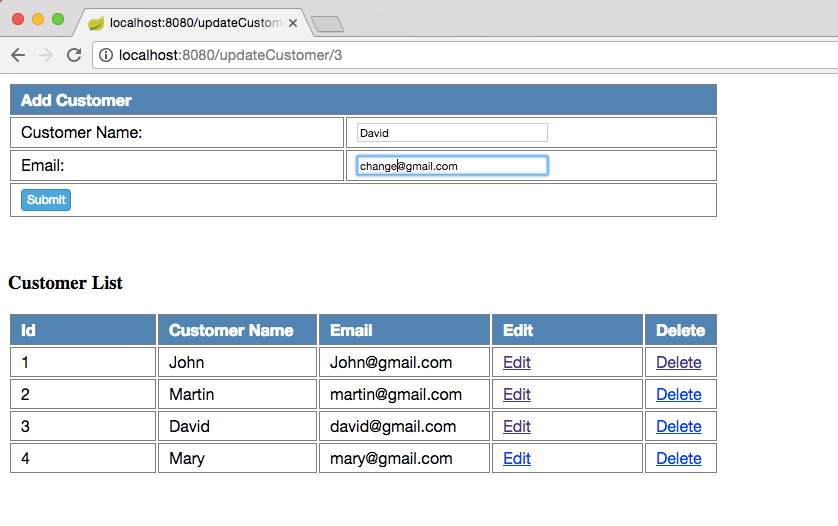
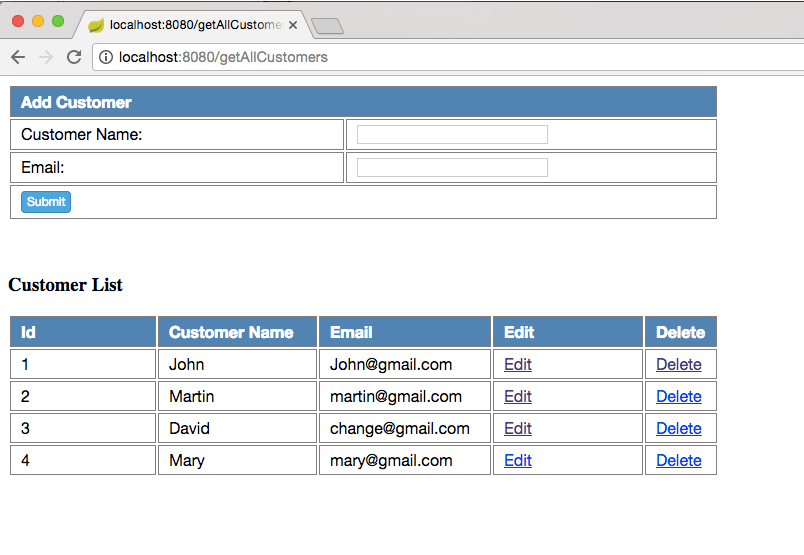
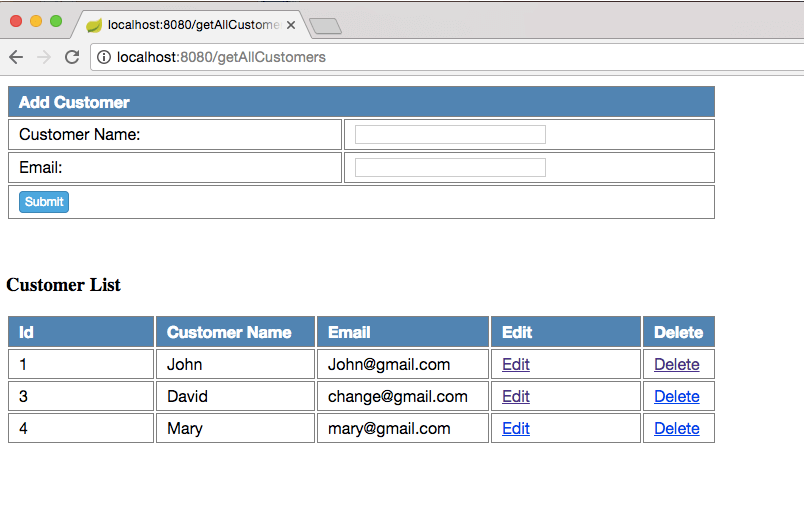
Step 14: Once you are done with Maven build, let’s go to the browser and put following URL.

Awesome work ! Thank You so much for sharing knowledge. It’s really helpful to me.
Really Helpful .. end to end knowledge is there.