Table of Contents
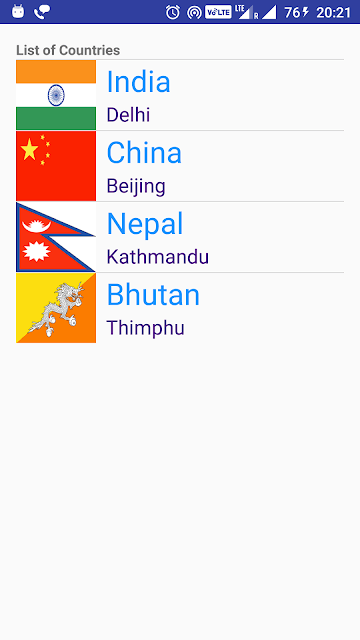
So we will create custom ListView in which each list item will have Country flag, Country name and its capital in different font size as below.
It is widely used in android apps to list number of items and select one or more items from the list.
Source code:
Step 1 :Creating Project
Create an android application project named “CustomListViewExampleApp”.
Step 2 : Creating Layout
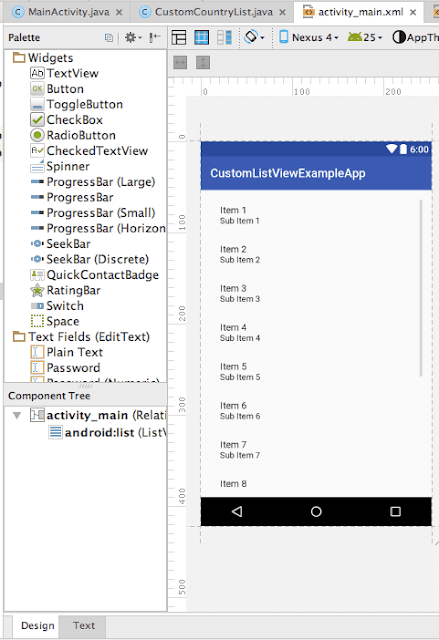
Change res ->layout -> activity_main.xml as below:
|
1 2 3 4 5 6 7 8 9 10 11 12 13 14 15 16 17 18 19 20 |
<?xml version="1.0" encoding="utf-8"?> <RelativeLayout xmlns:android="http://schemas.android.com/apk/res/android" xmlns:tools="http://schemas.android.com/tools" android:id="@+id/activity_main" android:layout_width="match_parent" android:layout_height="match_parent" android:paddingBottom="@dimen/activity_vertical_margin" android:paddingLeft="@dimen/activity_horizontal_margin" android:paddingRight="@dimen/activity_horizontal_margin" android:paddingTop="@dimen/activity_vertical_margin" tools:context="com.java2blog.customlistviewexampleapp.MainActivity"> <ListView android:id="@+id/android:list" android:layout_width="match_parent" android:layout_height="wrap_content" /> </RelativeLayout> |
You will see below screen in design view.
Step 3: Creating layout for Row
- Go to res -> layout
- right click on layout
- Click on New -> File.
- Create a file named “row_item.xml” and paste below code in row_item.xml.
|
1 2 3 4 5 6 7 8 9 10 11 12 13 14 15 16 17 18 19 20 21 22 23 24 25 26 27 28 29 30 31 32 33 34 35 36 37 38 39 |
<?xml version="1.0" encoding="utf-8"?> <GridLayout xmlns:android="http://schemas.android.com/apk/res/android" android:layout_width="match_parent" android:layout_height="match_parent" > <ImageView android:layout_rowSpan="2" android:layout_width="80dp" android:layout_height="70dp" android:scaleType="fitXY" android:id="@+id/imageViewFlag" android:layout_row="0" android:layout_column="0" /> <TextView android:layout_width="wrap_content" android:layout_height="wrap_content" android:layout_columnWeight="1" android:layout_marginLeft="10dp" android:textSize="30dp" android:textColor="#1E90FF" android:id="@+id/textViewCountry" android:layout_row="0" android:layout_column="1" /> <TextView android:layout_width="wrap_content" android:layout_height="wrap_content" android:layout_columnWeight="1" android:layout_marginLeft="10dp" android:textSize="20dp" android:textColor="#4B0082" android:id="@+id/textViewCapital" android:layout_row="1" android:layout_column="1" /> </GridLayout> |
Step 4 : Creating ArrayAdapter for ListView
|
1 2 3 4 5 6 7 8 9 10 11 12 13 14 15 16 17 18 19 20 21 22 23 24 25 26 27 28 29 30 31 32 33 34 35 36 37 38 39 40 41 42 43 44 45 46 |
package com.java2blog.customlistviewexampleapp; import android.app.Activity; import android.content.Context; import android.view.LayoutInflater; import android.view.View; import android.view.ViewGroup; import android.widget.ArrayAdapter; import android.widget.ImageView; import android.widget.TextView; import com.java2blog.customlistviewexampleapp.R; public class CustomCountryList extends ArrayAdapter { private String[] countryNames; private String[] capitalNames; private Integer[] imageid; private Activity context; public CustomCountryList(Activity context, String[] countryNames, String[] capitalNames, Integer[] imageid) { super(context, R.layout.row_item, countryNames); this.context = context; this.countryNames = countryNames; this.capitalNames = capitalNames; this.imageid = imageid; } @Override public View getView(int position, View convertView, ViewGroup parent) { View row=convertView; LayoutInflater inflater = context.getLayoutInflater(); if(convertView==null) row = inflater.inflate(R.layout.row_item, null, true); TextView textViewCountry = (TextView) row.findViewById(R.id.textViewCountry); TextView textViewCapital = (TextView) row.findViewById(R.id.textViewCapital); ImageView imageFlag = (ImageView) row.findViewById(R.id.imageViewFlag); textViewCountry.setText(countryNames[position]); textViewCapital.setText(capitalNames[position]); imageFlag.setImageResource(imageid[position]); return row; } } |
Step 5 : Creating MainActivity
Change src/main/packageName/MainActivity.java as below:
|
1 2 3 4 5 6 7 8 9 10 11 12 13 14 15 16 17 18 19 20 21 22 23 24 25 26 27 28 29 30 31 32 33 34 35 36 37 38 39 40 41 42 43 44 45 46 47 48 49 50 51 52 53 54 55 56 57 58 59 60 61 62 63 64 65 |
package com.java2blog.customlistviewexampleapp; import android.app.ListActivity; import android.graphics.Typeface; import android.os.Bundle; import android.view.View; import android.widget.AdapterView; import android.widget.ListView; import android.widget.TextView; import android.widget.Toast; import com.java2blog.customlistviewexampleapp.CustomCountryList; import com.java2blog.customlistviewexampleapp.R; public class MainActivity extends ListActivity { private ListView listView; private String countryNames[] = { "India", "China", "Nepal", "Bhutan" }; private String capitalNames[] = { "Delhi", "Beijing", "Kathmandu", "Thimphu" }; private Integer imageid[] = { R.drawable.india, R.drawable.china, R.drawable.nepal, R.drawable.bhutan }; @Override protected void onCreate(Bundle savedInstanceState) { super.onCreate(savedInstanceState); setContentView(R.layout.activity_main); // Setting header TextView textView = new TextView(this); textView.setTypeface(Typeface.DEFAULT_BOLD); textView.setText("List of Countries"); ListView listView=(ListView)findViewById(android.R.id.list); listView.addHeaderView(textView); // For populating list data CustomCountryList customCountryList = new CustomCountryList(this, countryNames, capitalNames, imageid); listView.setAdapter(customCountryList); listView.setOnItemClickListener(new AdapterView.OnItemClickListener() { @Override public void onItemClick(AdapterView<?> adapterView, View view, int position, long l) { Toast.makeText(getApplicationContext(),"You Selected "+countryNames[position-1]+ " as Country",Toast.LENGTH_SHORT).show(); } }); } } |
If you notice, we have extended to ListActivity for this class. ListActivity class provides some methods specific to ListView.
We have declared three arrays to take care of Country textView, Capital textView and flag ImageView and customCountryList is being used to populate data in ListView.
Step 6: Put images in drawable folder
Download source code, locate res -> drawable and put images in your application ‘s res -> drawable folder.
Step 7 : Running the app
When you run the app, you will get below screen:
When you click on Bhutan list item, you will get below screen:


