Table of Contents
When you created android application, your folder structure will look similar to below.
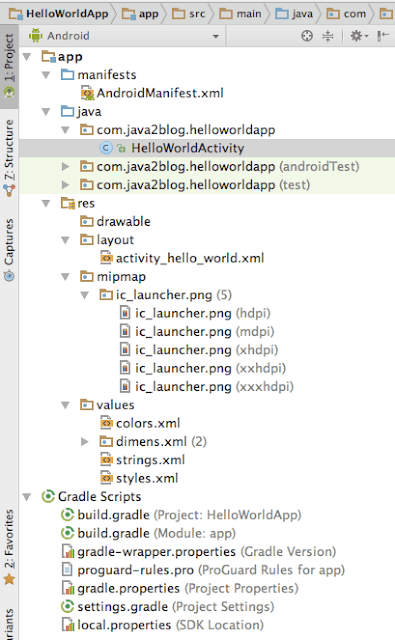
Lets understand above folder structure.
ApplicationManifest.xml:
ApplicationManifest.xml resides in src/main/.
Every application should have ApplicationManifest.xml in its root directory. It provides all important information to android system which system must have before it run the application.
We can declare following in ApplicationManifest.xml:
- Package Name
- Permissions of Application
- Declaration of Activity , Services, broadcast receivers etc.
- Minimum level of SDK and many more..
AndroidManifest.xml
|
1 2 3 4 5 6 7 8 9 10 11 12 13 14 15 16 17 18 19 20 21 22 |
<?xml version="1.0" encoding="utf-8"?> <manifest xmlns:android="http://schemas.android.com/apk/res/android" package="com.java2blog.helloworldapp"> <application android:allowBackup="true" android:icon="@mipmap/ic_launcher" android:label="@string/app_name" android:supportsRtl="true" android:theme="@style/AppTheme"> <activity android:name=".HelloWorldActivity"> <intent-filter> <action android:name="android.intent.action.MAIN" /> <category android:name="android.intent.category.LAUNCHER" /> </intent-filter> </activity> </application> </manifest>Activity: |
HelloWorldActivity.java
|
1 2 3 4 5 6 7 8 9 10 11 12 13 14 15 |
package com.java2blog.helloworldapp; import android.support.v7.app.AppCompatActivity; import android.os.Bundle; public class HelloWorldActivity extends AppCompatActivity { @Override protected void onCreate(Bundle savedInstanceState) { super.onCreate(savedInstanceState); setContentView(R.layout.activity_hello_world); } } |
res:
drawable:
layout:
|
1 2 3 |
setContentView(R.layout.activity_hello_world); |
setContentView actually binds layout to a activity. In our case, layout name is activity_hello_world.xml. If you open activity_hello_world.xml, you will see below screen.
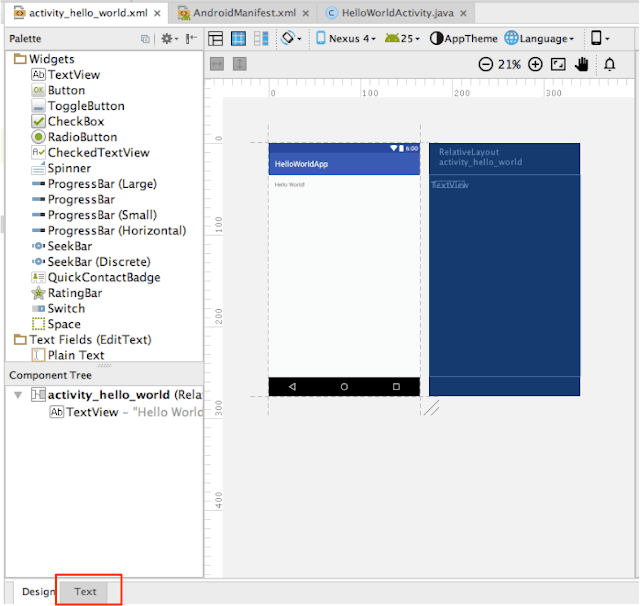
You can drag and drop widgets to screen using design interface.
You can click on Text as highlight above and you will see below xml
activity_hello_world.xml
|
1 2 3 4 5 6 7 8 9 10 11 12 13 14 15 16 17 18 19 |
<?xml version="1.0" encoding="utf-8"?> <RelativeLayout xmlns:android="http://schemas.android.com/apk/res/android" xmlns:tools="http://schemas.android.com/tools" android:id="@+id/activity_hello_world" android:layout_width="match_parent" android:layout_height="match_parent" android:paddingBottom="@dimen/activity_vertical_margin" android:paddingLeft="@dimen/activity_horizontal_margin" android:paddingRight="@dimen/activity_horizontal_margin" android:paddingTop="@dimen/activity_vertical_margin" tools:context="com.java2blog.helloworldapp.HelloWorldActivity"> <TextView android:layout_width="wrap_content" android:layout_height="wrap_content" android:text="Hello World!" /> </RelativeLayout> |
You can edit in above xml file also to make layout related changes.
mipmap :
This folder contains android application icon in different size.
values:
This folder will contains xml file which will have constant in it.
For example:
string.xml file have all strings declared in it, so you don’t have to hardcode anything in your java code.
Why you should not hardcode:
You have all strings in english as of now and you are going to release your application in french then if you hardcode everywhere then you need to change in search the strings and change in java code but if you do not hardcode anything, you just have to convert strings.xml strings in french and it will work.
Gradle scripts:
Gradle is open source automation tool similar to ant and maven. It is used to build project and include dependency in android studio. We will more about it later.
Exercise:
Lets do a small exercise to see if you understand above structure or not.
You need to make changes in hello world app and make output as below.
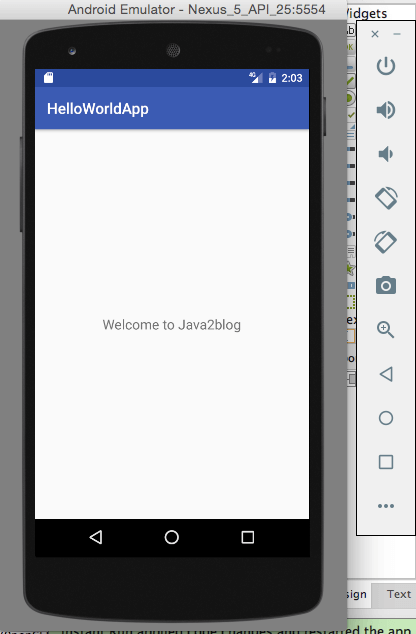
Do not hardcode “Welcome to Java2blog” in layout file. Put string contant in strings.xml
Solution:
- Click on activity_hello_world.xml in project structure.
- Drag “Hello world” string in Hello world app to center part using design layout.
- Add string constant with “Welcome to Java2blog” in strings.xml as below:
|
1 2 3 4 5 6 |
<resources> <string name="app_name">HelloWorldApp</string> <string name="welcome_java2blog">Welcome to Java2blog</string> </resources> |
- Make change in TextView attribute android:text as “@string/welcome_java2blog”
- Bingo!! You have completed basic exercise.


