Table of Contents
So we are going to get json from restful web services and then render json response to android custom listview.
Example :
I have already implemented restful webservices json example. I am going to use same example for implementation of restful web services.
If you are going to deploy above web service then use below url to fetch json data
|
1 2 3 |
<span style="color: green; font-weight: bold;">http://192.168.2.22:8080/JAXRSJsonExample/rest/countries</span> |
Here 192.168.2.22 is IP address of my machine. Once you implement this web services on your machine, you should replace it with your ip address.
If you don’t want to implement rest web service yourself and want below json response. You can use below link.
https://cdn.rawgit.com/arpitmandliya/AndroidRestJSONExample/master/countries.json
You will get below Json response from above URL:
|
1 2 3 4 5 6 7 8 9 10 11 12 13 14 15 16 17 18 19 20 |
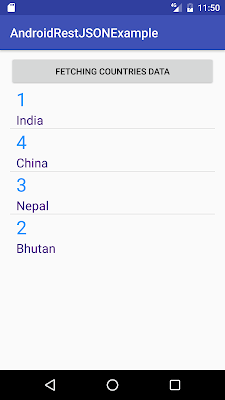
[ { "id":1, "countryName":"India" }, { "id":4, "countryName":"China" }, { "id":3, "countryName":"Nepal" }, { "id":2, "countryName":"Bhutan" } ] |
We are getting above Json array from rest web service. If you are not familiar with JSON, you can go through Json tutorial. We are going to render above JSON response to android custom listview as below:
Lets code this example now:
Source code:
Step 1 :Creating Project
Create an android application project named “AndroidRestJsonExample”.
Step 2 : Creating Layout
Change res ->layout -> activity_main.xml as below:
|
1 2 3 4 5 6 7 8 9 10 11 12 13 14 15 16 17 18 19 20 21 22 23 24 25 26 27 28 |
<?xml version="1.0" encoding="utf-8"?> <RelativeLayout xmlns:android="http://schemas.android.com/apk/res/android" xmlns:tools="http://schemas.android.com/tools" android:id="@+id/activity_main" android:layout_width="match_parent" android:layout_height="match_parent" android:paddingBottom="@dimen/activity_vertical_margin" android:paddingLeft="@dimen/activity_horizontal_margin" android:paddingRight="@dimen/activity_horizontal_margin" android:paddingTop="10dp" tools:context="com.java2blog.androidrestjsonexample.MainActivity"> <Button android:layout_width="match_parent" android:layout_height="wrap_content" android:text="Fetching countries data" android:id="@+id/btnSubmit" /> <ListView android:id="@+id/android:list" android:layout_width="match_parent" android:layout_height="wrap_content" android:layout_below="@id/btnSubmit" /> </RelativeLayout> |
We have one button and listview. When you click the button, we are going to populate data in listview by calling restful web services and render it on the listview.
Step 3: Creating layout for Row
- Go to res -> layout
- right click on layout
- Click on New -> File.
- Create a file named “row_item.xml” and paste below code in row_item.xml.
|
1 2 3 4 5 6 7 8 9 10 11 12 13 14 15 16 17 18 19 20 21 22 23 24 25 26 27 |
<?xml version="1.0" encoding="utf-8"?> <GridLayout xmlns:android="http://schemas.android.com/apk/res/android" android:layout_width="match_parent" android:layout_height="match_parent" > <TextView android:layout_width="wrap_content" android:layout_height="wrap_content" android:layout_columnWeight="1" android:layout_marginLeft="10dp" android:textSize="30dp" android:textColor="#1E90FF" android:id="@+id/textViewId" android:layout_row="0" android:layout_column="1" /> <TextView android:layout_width="wrap_content" android:layout_height="wrap_content" android:layout_columnWeight="1" android:layout_marginLeft="10dp" android:textSize="20dp" android:textColor="#4B0082" android:id="@+id/textViewCountry" android:layout_row="1" android:layout_column="1" /> </GridLayout> |
Step 4 : Creating model object Country :
If you notice, we are getting Json array from restful web service which has 4 items. Each item have two attributes id and countryName. We are going to create country object for each item.
|
1 2 3 4 5 6 7 8 9 10 11 12 13 14 15 16 17 18 19 20 21 22 23 24 25 |
package com.java2blog.androidrestjsonexample; public class Country{ int id; String countryName; public Country(int i, String countryName) { super(); this.id = i; this.countryName = countryName; } public int getId() { return id; } public void setId(int id) { this.id = id; } public String getCountryName() { return countryName; } public void setCountryName(String countryName) { this.countryName = countryName; } } |
Step 5 : Creating BaseAdapter for ListView
|
1 2 3 4 5 6 7 8 9 10 11 12 13 14 15 16 17 18 19 20 21 22 23 24 25 26 27 28 29 30 31 32 33 34 35 36 37 38 39 40 41 42 43 44 45 46 47 48 49 50 51 52 53 54 55 56 57 58 59 60 61 62 63 64 65 66 67 68 69 70 71 72 |
package com.java2blog.androidrestjsonexample; import android.app.Activity; import android.view.LayoutInflater; import android.view.View; import android.view.ViewGroup; import android.widget.BaseAdapter; import android.widget.TextView; import com.java2blog.androidrestjsonexample.Country; import com.java2blog.androidrestjsonexample.R; import java.util.ArrayList; public class CustomCountryList extends BaseAdapter { private Activity context; ArrayList countries; public CustomCountryList(Activity context, ArrayList countries) { // super(context, R.layout.row_item, countries); this.context = context; this.countries=countries; } public static class ViewHolder { TextView textViewId; TextView textViewCountry; } @Override public View getView(int position, View convertView, ViewGroup parent) { View row=convertView; LayoutInflater inflater = context.getLayoutInflater(); ViewHolder vh; if(convertView==null) { vh=new ViewHolder(); row = inflater.inflate(R.layout.row_item, null, true); vh.textViewId = (TextView) row.findViewById(R.id.textViewId); vh.textViewCountry = (TextView) row.findViewById(R.id.textViewCountry); // store the holder with the view. row.setTag(vh); } else { vh = (ViewHolder) convertView.getTag(); } vh.textViewCountry.setText(countries.get(position).getCountryName()); vh.textViewId.setText(""+countries.get(position).getId()); return row; } public long getItemId(int position) { return position; } public Object getItem(int position) { return position; } public int getCount() { if(countries.size()<=0) return 1; return countries.size(); } } |
Step 6 : Creating MainActivity
We are going to create a addition inner class GetServerData which extends AsyncTask. This class will make https call in background thread.
Here are three methods which you may need to implement while using AsyncTask.
- onPreExecute() : This method will get called before making HTTP call. We are initializing ProgressDialog here.
- doInBackground : We are going to make HTTP call in this method. We have use HttpURLConnection class to make HTTP call. You can not access any UI elements while executing this method
- onPostExecute : This executes after execution of doInBackground method. In this method, we are going to create CustomCountryList object and populate listview data.
Change src/main/packageName/MainActivity.java as below:
|
1 2 3 4 5 6 7 8 9 10 11 12 13 14 15 16 17 18 19 20 21 22 23 24 25 26 27 28 29 30 31 32 33 34 35 36 37 38 39 40 41 42 43 44 45 46 47 48 49 50 51 52 53 54 55 56 57 58 59 60 61 62 63 64 65 66 67 68 69 70 71 72 73 74 75 76 77 78 79 80 81 82 83 84 85 86 87 88 89 90 91 92 93 94 95 96 97 98 99 100 101 102 103 104 105 106 107 108 109 110 111 112 113 114 115 116 117 118 119 120 121 122 123 124 125 126 127 128 129 130 131 132 133 134 135 136 137 138 139 140 141 142 143 144 145 146 147 148 149 150 151 |
package com.java2blog.androidrestjsonexample; import android.app.Activity; import android.app.ProgressDialog; import android.os.AsyncTask; import android.os.Bundle; import android.os.StrictMode; import android.support.v7.app.AppCompatActivity; import android.util.Log; import android.view.View; import android.widget.AdapterView; import android.widget.Button; import android.widget.ListView; import android.widget.Toast; import org.json.JSONArray; import org.json.JSONException; import org.json.JSONObject; import java.io.BufferedReader; import java.io.InputStreamReader; import java.net.HttpURLConnection; import java.net.URL; import java.util.ArrayList; import javax.net.ssl.HttpsURLConnection; import static android.content.ContentValues.TAG; public class MainActivity extends AppCompatActivity { private Button btnSubmit; String responseText; StringBuffer response; URL url; Activity activity; ArrayList countries=new ArrayList(); private ProgressDialog progressDialog; ListView listView; // In case if you deploy rest web service, then use below link and replace below ip address with yours //http://192.168.2.22:8080/JAXRSJsonExample/rest/countries //Direct Web services URL private String path = "https://cdn.rawgit.com/arpitmandliya/AndroidRestJSONExample/master/countries.json"; @Override protected void onCreate(Bundle savedInstanceState) { super.onCreate(savedInstanceState); setContentView(R.layout.activity_main); activity = this; btnSubmit = (Button) findViewById(R.id.btnSubmit); listView = (ListView) findViewById(android.R.id.list); btnSubmit.setOnClickListener(new View.OnClickListener() { @Override public void onClick(View v) { countries.clear(); //Call WebService new GetServerData().execute(); } }); } class GetServerData extends AsyncTask { @Override protected void onPreExecute() { super.onPreExecute(); // Showing progress dialog progressDialog = new ProgressDialog(MainActivity.this); progressDialog.setMessage("Fetching conntry data"); progressDialog.setCancelable(false); progressDialog.show(); } @Override protected Object doInBackground(Object[] objects) { return getWebServiceResponseData(); } @Override protected void onPostExecute(Object o) { super.onPostExecute(o); // Dismiss the progress dialog if (progressDialog.isShowing()) progressDialog.dismiss(); // For populating list data CustomCountryList customCountryList = new CustomCountryList(activity, countries); listView.setAdapter(customCountryList); listView.setOnItemClickListener(new AdapterView.OnItemClickListener() { @Override public void onItemClick(AdapterView<?> adapterView, View view, int position, long l) { Toast.makeText(getApplicationContext(),"You Selected "+countries.get(position).getCountryName()+ " as Country",Toast.LENGTH_SHORT).show(); } }); } } protected Void getWebServiceResponseData() { try { url = new URL(path); Log.d(TAG, "ServerData: " + path); HttpURLConnection conn = (HttpURLConnection) url.openConnection(); conn.setReadTimeout(15000); conn.setConnectTimeout(15000); conn.setRequestMethod("GET"); int responseCode = conn.getResponseCode(); Log.d(TAG, "Response code: " + responseCode); if (responseCode == HttpsURLConnection.HTTP_OK) { // Reading response from input Stream BufferedReader in = new BufferedReader( new InputStreamReader(conn.getInputStream())); String output; response = new StringBuffer(); while ((output = in.readLine()) != null) { response.append(output); } in.close(); }} catch(Exception e){ e.printStackTrace(); } responseText = response.toString(); //Call ServerData() method to call webservice and store result in response // response = service.ServerData(path, postDataParams); Log.d(TAG, "data:" + responseText); try { JSONArray jsonarray = new JSONArray(responseText); for (int i = 0; i < jsonarray.length(); i++) { JSONObject jsonobject = jsonarray.getJSONObject(i); int id = jsonobject.getInt("id"); String country = jsonobject.getString("countryName"); Log.d(TAG, "id:" + id); Log.d(TAG, "country:" + country); Country countryObj=new Country(id,country); countries.add(countryObj); } } catch (JSONException e) { e.printStackTrace(); } return null; } } |
Step 7: Add internet permission in AndroidManifest.xml
Copy following code:
|
1 2 3 |
<uses-permission android:name="android.permission.INTERNET" /> |
Put it in AndroidManifest.xml
|
1 2 3 4 5 6 7 8 9 10 11 12 13 14 15 16 17 18 19 20 21 22 23 |
<?xml version="1.0" encoding="utf-8"?> <manifest xmlns:android="http://schemas.android.com/apk/res/android" package="com.java2blog.androidrestjsonexample"> <uses-permission android:name="android.permission.INTERNET" /> <application android:allowBackup="true" android:icon="@mipmap/ic_launcher" android:label="@string/app_name" android:supportsRtl="true" android:theme="@style/AppTheme"> <activity android:name=".MainActivity"> <intent-filter> <action android:name="android.intent.action.MAIN" /> <category android:name="android.intent.category.LAUNCHER" /> </intent-filter> </activity> </application> </manifest> |
Step 8 : Running the app
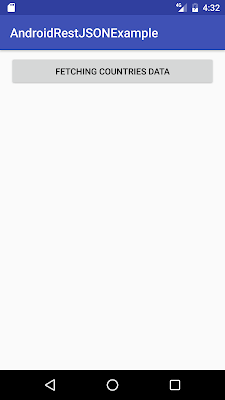
When you run the app, you will get below screen:
When you click on above button, you will get below screen.
We are done with Android Restful web services json example. If you are facing any issue, please comment.


thanks for this simply and soft tutorial