Table of Contents
In this post, we will see Spring MVC hello world example using maven.
Spring MVC tutorial:
- Spring MVC hello world example
- Spring MVC Hibernate MySQL example
- Spring MVC interceptor example
- Spring MVC angularjs example
- Spring MVC @RequestMapping example
- Spring Component,Service, Repository and Controller example
- Spring MVC @ModelAttribute annotation example
- Spring MVC @RestController annotation example
- Spring MultiActionController Example
- Spring MVC ModelMap
- Spring MVC file upload example
- Spring restful web service example
- Spring restful web service json example
- Spring Restful web services CRUD example
- Spring security hello world example
- Spring security custom login form example
Tools used for this post are:
- Eclipse
- Maven plugin(m2eclipse)
- JDK 1.7
- Apache tomcat 8
Steps for creating Spring MVC hello world example.
1) Install m2eclipse for maven plugin in eclipse. Please follow this link for installing m2eclipse plugin in eclipse.
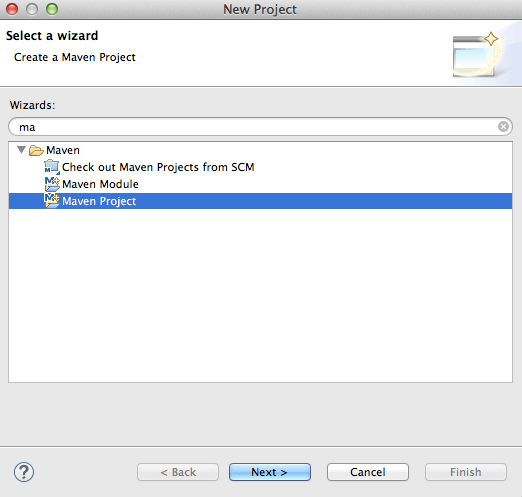
2) goto new -> project-> Maven Project and click on next
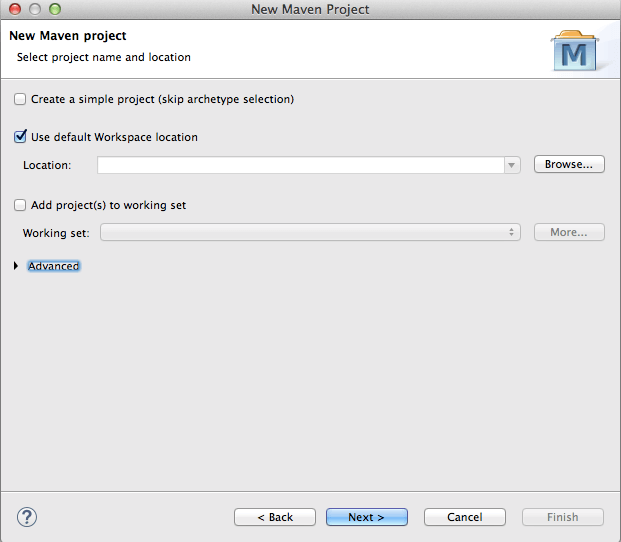
3) You will see below screen , again click on next
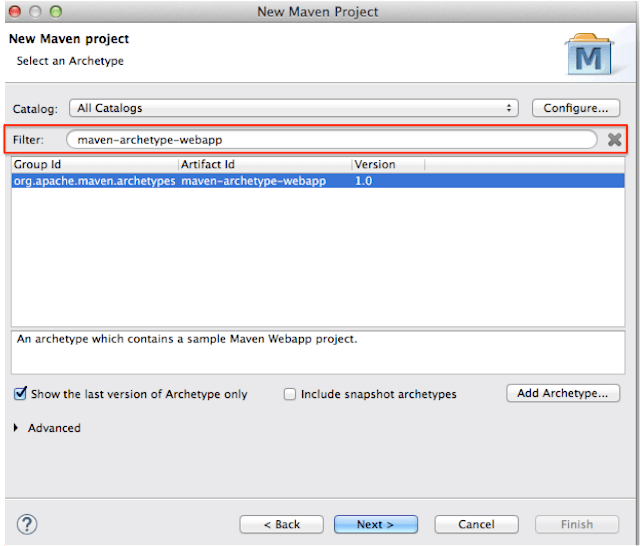
4) We need to select type of archetype here.As we are creating web app here, please put following text in filter : maven-archetype-webapp
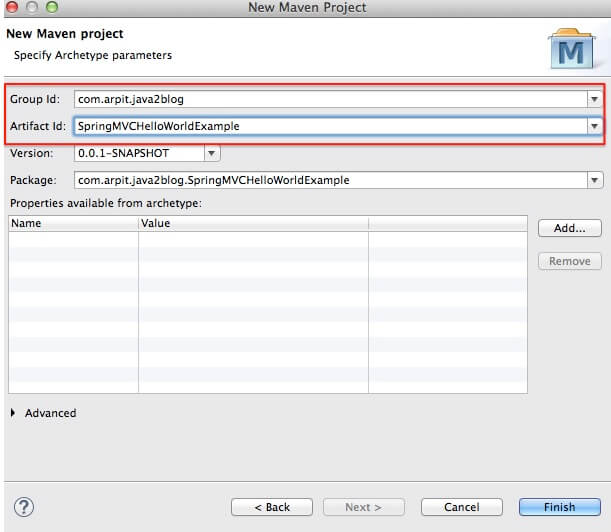
5) We need to put group id and artifact id here.
Let me tell you more about group id and artifact id.
Group id : It uniquely identifies your project among all. So it may be something like com.companyname
Artifact id : It is name of jar or war without version. it may be something like project, so here we have put artifact id as mavenWebApp
Version : Version is used for version control for artifact id. If you distribute this project, you may incrementally create different version of it.
Adding Spring MVC dependency
|
1 2 3 4 5 6 7 8 9 10 11 12 13 14 15 16 17 18 19 20 21 22 23 24 25 26 27 28 29 30 31 32 33 34 35 36 37 38 39 40 41 42 43 44 45 46 47 48 49 50 51 52 53 54 55 56 |
<project xmlns="http://maven.apache.org/POM/4.0.0" xmlns:xsi="http://www.w3.org/2001/XMLSchema-instance" xsi:schemaLocation="http://maven.apache.org/POM/4.0.0 http://maven.apache.org/maven-v4_0_0.xsd"> <modelVersion>4.0.0</modelVersion> <groupId>com.arpit.java2blog</groupId> <artifactId>SpringMVCHelloWorldExample</artifactId> <packaging>war</packaging> <version>0.0.1-SNAPSHOT</version> <name>SpringMVCHelloWorldExample Maven Webapp</name> <url>http://maven.apache.org</url> <dependencies> <dependency> <groupId>junit</groupId> <artifactId>junit</artifactId> <version>3.8.1</version> <scope>test</scope> </dependency> <dependency> <groupId>javax.servlet</groupId> <artifactId>javax.servlet-api</artifactId> <version>3.1.0</version> </dependency> <dependency> <groupId>org.springframework</groupId> <artifactId>spring-core</artifactId> <version>${spring.version}</version> </dependency> <dependency> <groupId>org.springframework</groupId> <artifactId>spring-webmvc</artifactId> <version>${spring.version}</version> </dependency> </dependencies> <build> <finalName>SpringMVCHelloWorldExample</finalName> <plugins> <plugin> <groupId>org.apache.maven.plugins</groupId> <artifactId>maven-compiler-plugin</artifactId> <version>3.1</version> <configuration> <source>${jdk.version}</source> <target>${jdk.version}</target> </configuration> </plugin> </plugins> </build> <properties> <spring.version>4.2.1.RELEASE</spring.version> <jdk.version>1.7</jdk.version> </properties> </project> |
Create Controller and view
7) Create a package named “org.arpit.java2blog.springmvc.controller”
create a controller class named “HelloWorldController.java”
|
1 2 3 4 5 6 7 8 9 10 11 12 13 14 15 16 17 18 |
package org.arpit.java2blog.springmvc.controller; import org.springframework.stereotype.Controller; import org.springframework.web.bind.annotation.RequestMapping; import org.springframework.web.servlet.ModelAndView; @Controller public class HelloWorldController { @RequestMapping("/helloworld") public ModelAndView hello() { String helloWorldMessage = "Hello world from java2blog!"; return new ModelAndView("hello", "message", helloWorldMessage); } } |
As request first goes to dispatcherServlet and it redirects to controller class. Here @Controller depicts that this is our controller class. @RequestMapper is used to map incoming http request to handler method(hello() in above controller).So hello() method of HelloWorldController.java will handle GET request from dispatcher.So when we have url of
|
1 2 3 4 |
http://localhost:8080/SpringMVCHelloWorldExample/helloworld or http://localhost:8080/SpringMVCHelloWorldExample/helloworld.html |
above method will get called.
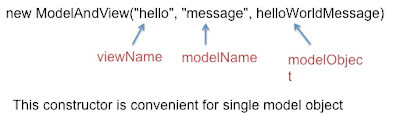
As you can see ModelAndView object is being returned in hello() method. It will call below constructor of ModelAndView class.
ModelAndView(String viewName, String modelName, Object modelObject)
Below diagram will make it clear
8) Modify index.jsp as below
|
1 2 3 4 5 6 7 8 9 10 11 12 13 14 |
<%@ page language="java" contentType="text/html; charset=UTF-8" pageEncoding="UTF-8"%> <!DOCTYPE html PUBLIC "-//W3C//DTD HTML 4.01 Transitional//EN" "http://www.w3.org/TR/html4/loose.dtd"> <html> <head> <meta http-equiv="Content-Type" content="text/html; charset=UTF-8"> <title>HelloWorld</title> </head> <body> <a href="helloworld.html">Click here to read hello message </a> </body> </html> |
Create hello.jsp in /WEB-INF/ folder
|
1 2 3 4 5 6 7 8 9 10 11 12 13 14 |
<%@ page language="java" contentType="text/html; charset=UTF-8" pageEncoding="UTF-8"%> <!DOCTYPE html PUBLIC "-//W3C//DTD HTML 4.01 Transitional//EN" "http://www.w3.org/TR/html4/loose.dtd"> <html> <head> <meta http-equiv="Content-Type" content="text/html; charset=UTF-8"> <title>Hello</title> </head> <body> ${message} </body> </html> |
Configuring spring mvc application
|
1 2 3 4 5 6 7 8 9 10 11 12 13 14 15 16 17 18 19 20 21 22 23 |
<web-app xmlns="http://java.sun.com/xml/ns/javaee" xmlns:xsi="http://www.w3.org/2001/XMLSchema-instance" xsi:schemaLocation="http://java.sun.com/xml/ns/javaee http://java.sun.com/xml/ns/javaee/web-app_3_0.xsd" version="3.0"> <display-name>Archetype Created Web Application</display-name> <welcome-file-list> <welcome-file>index.jsp</welcome-file> </welcome-file-list> <servlet> <servlet-name>springmvc-dispatcher</servlet-name> <servlet-class> org.springframework.web.servlet.DispatcherServlet </servlet-class> <load-on-startup>1</load-on-startup> </servlet> <servlet-mapping> <servlet-name>springmvc-dispatcher</servlet-name> <url-pattern>/</url-pattern> </servlet-mapping> </web-app> |
10) create xml file named “springmvc-dispatcher-servlet.xml” in /WEB-INF folder as below.
|
1 2 3 4 5 6 7 8 9 10 11 12 13 14 15 16 17 18 19 20 21 22 |
<beans xmlns="http://www.springframework.org/schema/beans" xmlns:context="http://www.springframework.org/schema/context" xmlns:mvc="http://www.springframework.org/schema/mvc" xmlns:xsi="http://www.w3.org/2001/XMLSchema-instance" xsi:schemaLocation=" http://www.springframework.org/schema/beans http://www.springframework.org/schema/beans/spring-beans-3.0.xsd http://www.springframework.org/schema/context http://www.springframework.org/schema/context/spring-context-3.0.xsd http://www.springframework.org/schema/mvc http://www.springframework.org/schema/mvc/spring-mvc-3.0.xsd"> <context:component-scan base-package="org.arpit.java2blog.springmvc.controller" /> <bean class="org.springframework.web.servlet.view.InternalResourceViewResolver"> <property name="prefix"> <value>/WEB-INF/</value> </property> <property name="suffix"> <value>.jsp</value> </property> </bean> <mvc:annotation-driven/> </beans> |
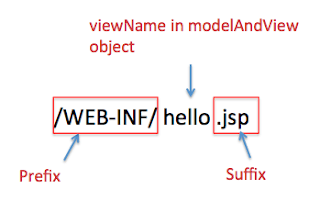
InternalResourceViewResolver is resource view resolver bean which will resolve view, prefix and suffix will be added to view used in ModelViewObject. As we have used “hello” as viewName in ModelAndView object. It will search for view in /WEB-INF/hello.jsp.
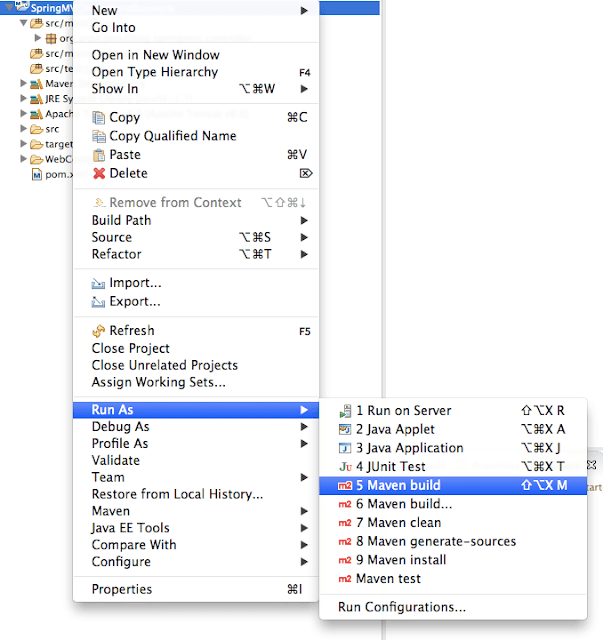
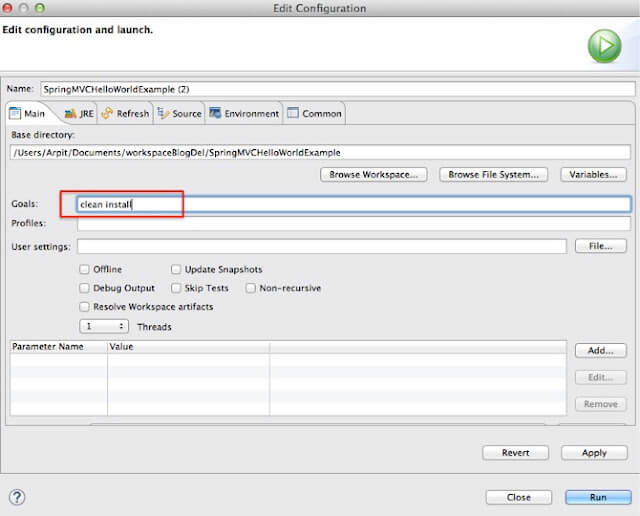
11) It ‘s time to do maven build.
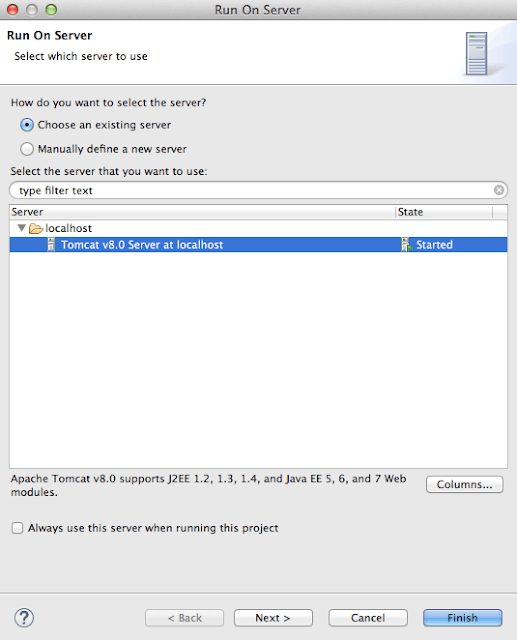
Run the application
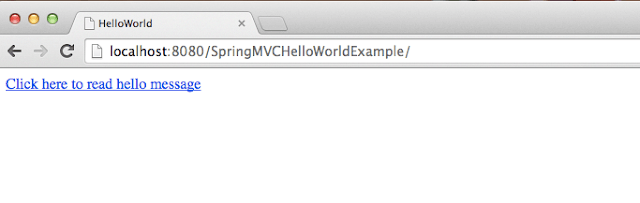
When you click on above link, you will get below screen

We are done with Spring MVC hello example. If you are still facing any issue, please comment.
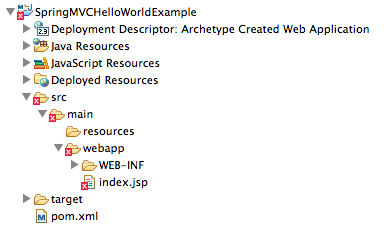
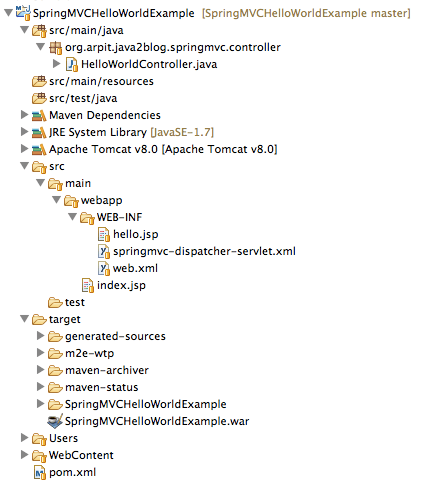
Project structure:
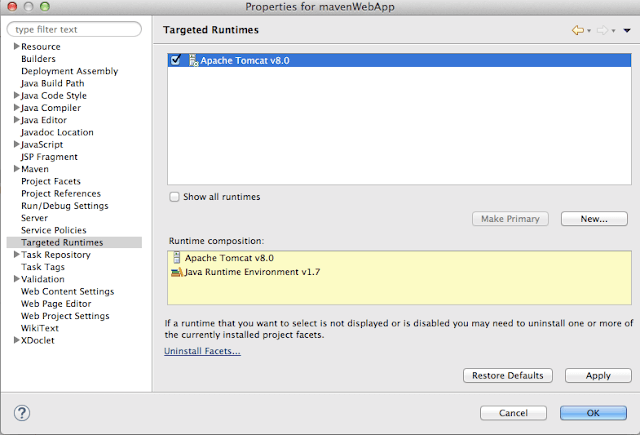
If you getting 404 error with above steps, you may need to follow below steps:
1) If you are getting this warning into your Tomcat startup console log, then it can cause the issue
WARNING: [SetPropertiesRule]{Server/Service/Engine/Host/Context} Setting property ‘source’ to ‘org.eclipse.jst.j2ee.server:SpringMVCHelloWorldExample’ did not find a matching property.
This particular warning basically means that the element in Tomcat’s server.xml contains an unknown attribute source and that Tomcat doesn’t know what to do with this attribute and therefore will ignore it.
To resolve this in eclipse,
Remove the project from the server from the Server View. Right click on server -> add and remove
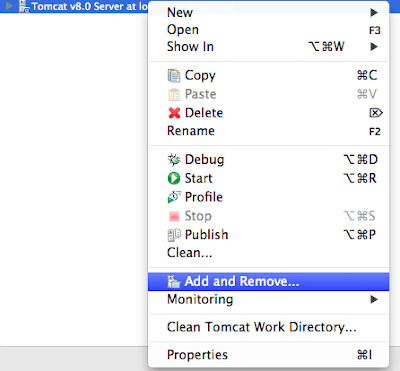
then remove project from server configuration.
Then run the project under the same server. Warning should be removed now
Or if warning still remains then
- Go to server view
- Double click on your tomcat server. It will open the server configuration.
- Under server options check ‘Publish module contents to separate XML files’ checkbox.
- Restart your server. This time your page will come without any issues.
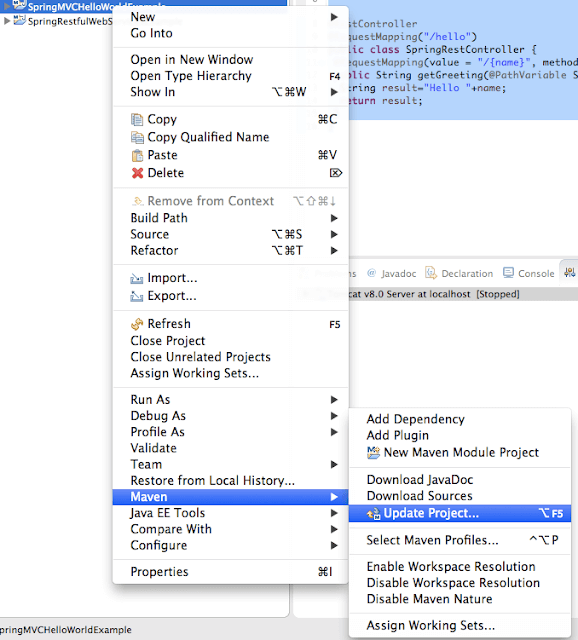
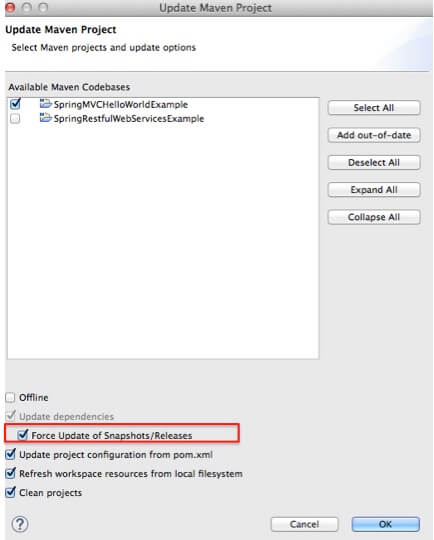
2) Try to update Maven project.
Right click on project ->Maven-> update project
then
This should solve you issues.


Hi billsd,
As you had mentioned, you are getting this warning into your Tomcat startup console log, then it can cause the issue
WARNING: [SetPropertiesRule]{Server/Service/Engine/Host/Context} Setting property 'source' to 'org.eclipse.jst.j2ee.server:SpringMVCHelloWorldExample' did not find a matching property.
This particular warning basically means that the element in Tomcat's server.xml contains an unknown attribute source and that Tomcat doesn't know what to do with this attribute and therefore will ignore it.
To resolve this in eclipse,
Remove the project from the server from the Server View. Right click on server -> add and remove
then remove project from server configuration.
Then run the project under the same server. Warning should be removed now
Or if warning still remains then
Go to server view
Double click on your tomcat server. It will open the server configuration.
Under server options check ‘Publish module contents to separate XML files’ checkbox.
Restart your server. This time your page will come without any issues.
Please let me know if above solution solved your issue. I have updated article too.
I actually did a lot of Googling yesterday and found out that that message is irrelevant. It's caused by Eclipse. Eclipse inserts a source attribute into the Context element to keep track of which app is associated with which project. The source attribute is undefined in JEE for the Context element so Tomcat prints a warning but otherwise ignores it. It's harmless. If I ran it on the sever outside of Eclipse and removed that attribute, it would work without giving that warning. Inside Eclipse, it needs to be there.
Try running deploying yours and look at your logs. You probably get that warning too and didn't notice it.
Hi bill,
I have added source code also now at the end of post. I have just tested it and it works fine.
Please import the project as maven project and try to run it.
Hope this helps.
Thanks for following this post
It turned out I had some other problems with my eclipse stuff. I fixed those and now I get this:
org.apache.catalina.core.ApplicationContext log INFO: No Spring WebApplicationInitializer types detected on classpath
org.apache.catalina.core.ApplicationContext log INFO: Initializing Spring FrameworkServlet 'springmvc-dispatcher'
org.springframework.web.servlet.DispatcherServlet initServletBean INFO: FrameworkServlet 'springmvc-dispatcher': initialization started
org.springframework.web.context.support.XmlWebApplicationContext prepareRefresh INFO: Refreshing WebApplicationContext for namespace 'springmvc-dispatcher-servlet': startup date [Sun Sep 13 10:49:17 PDT 2015]; root of context hierarchy
org.springframework.beans.factory.xml.XmlBeanDefinitionReader loadBeanDefinitions INFO: Loading XML bean definitions from ServletContext resource [/WEB-INF/springmvc-dispatcher-servlet.xml]
org.springframework.web.servlet.mvc.method.annotation.RequestMappingHandlerAdapter initControllerAdviceCache INFO: Looking for @ControllerAdvice: WebApplicationContext for namespace 'springmvc-dispatcher-servlet': startup date [Sun Sep 13 10:49:17 PDT 2015]; root of context hierarchy
org.springframework.web.servlet.mvc.method.annotation.RequestMappingHandlerAdapter initControllerAdviceCache INFO: Looking for @ControllerAdvice: WebApplicationContext for namespace 'springmvc-dispatcher-servlet': startup date [Sun Sep 13 10:49:17 PDT 2015]; root of context hierarchy
org.springframework.web.servlet.DispatcherServlet initServletBean INFO: FrameworkServlet 'springmvc-dispatcher': initialization completed in 1462 ms
org.apache.coyote.AbstractProtocol start INFO: Starting ProtocolHandler [“http-apr-8080”]
org.apache.coyote.AbstractProtocol start INFO: Starting ProtocolHandler [“ajp-apr-8009”]
org.apache.catalina.startup.Catalina start INFO: Server startup in 2930 ms
org.springframework.web.servlet.PageNotFound noHandlerFound WARNING: No mapping found for HTTP request with URI [/HelloWorld/helloworld] in DispatcherServlet with name 'springmvc-dispatcher'
Hi bill,
Could you please check if .class of contoller is generated in this folder
/SpringMVCHelloWorldExample/target/SpringMVCHelloWorldExample/WEB-INF/classes/org/arpit/java2blog/springmvc/controller
Just change SpringMVCHelloWorldExample with your project name.
Also make sure you are creating controller class in
src/main/java/org.arpit.java2blog.springmvc.controller folder.
Let me know if it helps
where is the helloworld.html file defined in here ??????????
In springmvc-dispatcher-servlet.xml line 7 remember to change the base-package name to your controller package name.
Amazing, I tested it following the tutorial, but I must have made some mistake and it didn't work. Then I downloaded the code and imported it , and it's worked. I'm really thankful.
And the correct material found here .. Thanks